The Things I Teach....


Reflector: Light Modifiers
There is no doubt that using natural light in portrait photography can get you the best results. However sometimes, as you all probably know, natural light does not do what he’s told. So here comes into action what I like to call my secret weapon in outdoor Portrait Photography.
It is cheap, easy to carry and especially does not frightens my subjects, who themselves can be a little intimidating at times. The Reflector
It is just that! It reflects light. There are hundreds of different types of reflectors, which differ in sizes and colors (i.e. white, silver, gold, etc.).
A reflector is usually a reflective fabric, stretched over a bendy ring, allowing it to fold, and easy to carry.


With so many types of reflectors on the market, I cannot review them all. This mini-guide will focus on the main reflector I use for my work. 12 ” in size, and costs less than a movie theatre ticket. I sometimes use other larger reflectors (mainly in cinematography productions), but this 12 inch reflector suits my needs in travel photography; mainly because it is small enough, allowing me to hold it with one hand and the camera with the other.
To Fill Up Shadows:
We all love taking pictures at sunrise and sunset. But when dealing with the harsh mid-day light, a reflector is almost a must.


By using the different colors of the reflector you can affect the outcome or feel / mood of the photograph to suit your purpose.
Remember you control how the image looks.. you don't have to guess or get lucky.

To aid in using this wonderful modifier... here are three (3) ways to use the reflector / modifier.
Open - Shade
Using the reflector bounce light in on a subject positioned in a shaded area. See Diagram.

Another sample using a smaller round reflector (12" - 16") that is only illuminating her face.

In this particular Sample the Model is placed in the shade and some Back Light is also coming through and rimming her hair. The large reflector is used to bounce a lot of light brightening her entire front side which would normally be in shadow.

Window Light
Using the Reflector Bounce light to illuminate the unlit section of a subject near a window.


In this sample.. the photographer is using the difused window pain to soften the bright exterior light coming through on the young subject the reflector is placed below the subject to illuminate the shadows under the chin.

The perfect depiction of the diagram setup using a gold reflector during the golden hour.
Below demonstrates how to use a flash light to add light from the reflector when the geometry of the house does not allow for the reflector to gather natural light.

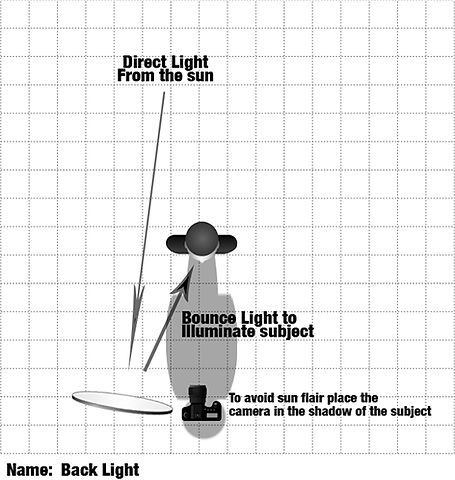
Back Light
Using the reflector bounce light coming from behind the subject onto the unlit portion.

Please see Mr.D with any questions you may have.. or for the latest tips. You can email him too.......

The above image is your classic back light portrait, using the reflector to fill shadows.
Below the photographer is allowing the sun to slip past the model directly into the camera creating flare. The gold reflector compensates for the additional light evening out the exposure.
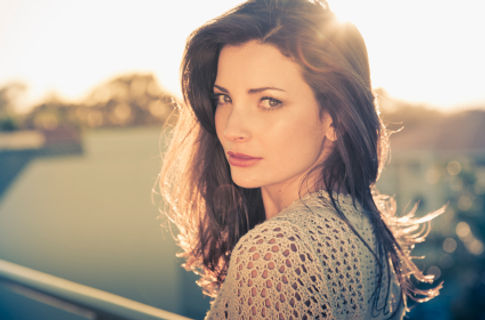
The image to the left is another classic back light portrait using the sun the completely rim the back of the head.
Another creative Back Light Portrait is below.
